29 December 2011

Happy Birthday Andrea .......


Happy Birthday Andrea!!
I've made you a pink and black birthday card using a Lili of the Valley image which I coloured with copics. I used spotty pink organza ribbon and sections ofa zva clear crystal flourish


The flowers are a 30mm pink/white rose, 20mm pink rosebud, white pretty blossoms and 13mm pink/white roses while the leaves are made with my new Magnolia leaf dies and my Martha Stewart punches.  Ribbon, Zva and Mulberry Flowers from here


The sentiment is a LOTV stamp cut with plain round nestie on scalloped black background
I hope you enjoy your day crafting with the girls down in Middlesbrough
love from Mam xx

27 December 2011

A mini vinage style winter wedding card and box set ..........


I based this vintage style mini card project on the sketch over at Papertake Weekly - please pop over and take a look at the wonderful cards made by the design team

This winter wedding card and box set is for Clare and Joseph who are being  married on Friday.  The card is a vintage style mini card using a portion of a LOTV die cut on kraft background.


I went overboard with embellishments and used ivory tulle and white crazy mesh to compliment the bride's veil on the die cut, a die cut swirl and a beautiful diamante snowflake stick pin.


I wanted to use pale pink pure silk ribbon but it was too wide for my mini 4 inch card, so I hit on the idea of twisting it - it worked a treat, then I added dusky rose tiny ric rac, some cream cotton  lace and some mulberry flowers which were distressed with tea dye ink.  The background papers were all machine stitched to kraft card.


Because this is for a wedding I went to town on the box and tried to make it very pretty so it would be kept for a long time.  Mulberry rose, silk ribbon,  etc plus clear crystal Zva swirl with a little kraft tag.


A photo of the card inside the box


To the inside of the card I added this lovely passage from Corinthians which begins 'Love is patient, love is kind .....
 I wish Clare and Joseph all of God's many blessings and a lifetime of happiness

Lace, silk ribbon, Zva crystals, diamante stick pin, ric rac, tulle, crazy mesh and mulberry flowers are all from Ribbon Girl
I am enterng this card into Totally Gorjuss challenge 'for someone special'

See you soon, MaryG x

26 December 2011

A Happy New Year card with spots and stripes ....


We had a lovely Christmas Eve and Christmas Day, cooking, eating, singing carols - I got some fab presents and Santa brought me three new Magnolia dies and I've used two of the branch dies on this card which I made this morning while hubby was at a football match.  The image was coloured with Copics and I've used some cherry blossom Pion papers (which I gave to Andrea as a Christmas gift - but we share all our crafting supplies lol)   I cut the image with a nestie but before I took off the die, I distressed the background and over the actual die with tea dye ink which left a lovely little border.  Th square background paper has been mounted onto kraft card, then onto a kraft card, if you know what I mean. The lace is cream cluny traditional fan pattern and the ribbon is peach satin bands


I used the same tea dye distress ink to colour a 30m white rose, white pretty blossoms and a couple of white rosebuds  then added a pearl hat pin (it was too long so I stuck it through though the ribbon to secure it, then cut it short using strong wire cutters)

I will enter this card into the  Magnolia Inspiration Challenge Blog  (the challenge is 'happy new year') and also into the Daring Card Makers challenge to use spots and stripes  (I have used striped and spotted papers from Pion Design behind the image)

Lace, ribbon, hat pin and all Mulberry flowers are from Ribbon Girl
See you soon Mary G x

21 December 2011

Birthday wishes in white with one other colour .......


Inspired by the current Just Magnolia challenge 'White plus one other colour.....' I have made this card in white and lilac.  The image has been coloured with copics and I have used white and  silver striped organza ribbon and 32mm white cotton lace over a fairly plain lilac/white spotted backing paper.

I used my magnolia leaf die and our new swirl die and distressed all edges with purple ink, plus a 30mm mulberry rose coloured with the same ink, some pretty blossoms and rosebuds.

I added a silver colour charm suspended on a piece of plum purple Divine Bakers Twine  and then some stardust stickles


The final touches were one small clear sparkly gem on the little Hanglar girl's dress and a sentiment from Papertrey stamped in purple ink

Striped Organza, Cotton Lace, Divine Twine, Charm and Mulberry Flowers all from Ribbon Girl
See you soon, Mary G x

20 December 2011

Vintage style Christmas mini card and box set ........


There's a new challenge over at Papertake Weekly - Last Christmas (card of the year)  - and  this is my take on it - a mini card and box set - this is especially for my sister who dislikes flowers on cards so this one has a couple of green leaves and some stamens coloured red with a Copics pen!  I used some 32mm cream vintage style very fine cluny lace, black stripe twill, 7mm red satin, part of a Zva clear crystal swirl and some cream mini pom pom trim, all from Ribbon Girl.  It's amazing how much stuff I can cram on to one of these little 4 inch cards!  All the edges were distresed with Tea Dye distress ink.


The lid was enhanced with more black twill and cream lace plus Venetian Red Vintage Style Seam Binding and small silver jingle bells


I made the tags with a Papertrey die and rubber stamp and as usual the box is made to measure.  All the background papers (Authentique) are machine stitched onto kraft card and the 2 and 5 are tucked behind the ribbon.

Please pop over to Papertake Weekly and take a look at the fabulous projects by the Design Team - I bet you've got time to get one more card made before Christmas for this challenge and there's a great prize as usual!
See you soon, Mary G x

18 December 2011

Red black and cream ........... it's beginning to look a lot like Christmas!


This is my DT card for the Ribbon Girl Red/Black/Cream colour challenge. I made a vintage style 4 inch mini card and matching box using papers from Authentique, cream cotton lace, cream and black check ribbon and 7mm red satin ribbon.  The tag is made from kraft card using a Papertrey die and sentiment stamp.  The button is a flower shaped sparkly acrylic button tied with ivory button twine


I machine stitched the pieces of paper to a kraft background and added Zva clear crystal swirl - there is a lot going on in this card set, but I thoroughly enjoyed creating it!


Another view of the box to which I added a small red polka dot button and a kraft tag stamped with a Papertrey sentiment.

I hope you will have time to pop  over to the Ribbon Girl blog and be inspired by the fabulous projects made by the mega talented Ribbon Girls!  We're keeping the challenge open until Saturday 7th January and there are some fab prizes to win!

Red Satin Ribbon, Black/Cream Check Ribbon, Flower Button, Button Twine, Zva Clear Crystal Flourish and Cream Cotton Lace all from the Ribbon Girl

See you soon, Mary G x

14 December 2011

Vintage look sparkly mini card and box set ........................


During our Mother/Daughter crafting time at the weekend, I followed Andrea's lead and tried my hand at making tiny 4 inch cards and I thoroughly enjoyed making this little vintage pink and sparkly set. 
This card and matching box took longer to make than the 14.5cm card I usually make, but I think it was well worth the extra effort.
I achieved the vintage look by distressing everything with  straw/brown distressing inks.  The background paper (a digi download) is machine stitched onto kraft card and the little tag is cut from a scrap of kraft using a Papertrey die then stamped with a Papertrey sentiment.


I cut up a Zva clear crystal swirl and added a couple of pieces to the card.  I used mauve scallop cotton lace, posie seam binding and pale pink mini ric rac, then added 25mm and 13mm pink/white mulberry roses with white rosebuds and rose leaves (all distressed) with green leaves cut with my Martha Stewart punch (which seized up at the weekend, I hope I haven't worn it out !!)


I spent ages making and decorating the matching box - as you can see the top of the box is just as pretty as the actual card (which has machine stitching) and even the sides of the lid and the inside of the box have been decorated  - I think it would make a lovely little keepsake box.
I will enter this set into the Cupcake Challenge which is to make something sparkly
and into the Pixie Dust Challenge (Sparkle and Bling)
See you soon, Mary G x

13 December 2011

I'm Dreamin' of a Pink and Blue Christmas ........


This is my DT card for this weeks Papertake Weekly Challenge - I'm Dreamin' Of A (My Favourite Colour) Christmas and as you can see, I've made a pink and blue Christmas card lol


The snowman image and the background papers are digital downloads by Mary Fran from Nitwits.
I used a nestie for the scalloped mat and then added lots of Stardust tickles (edited to say this should have said 'Stickles'  but Stardust Tickles sounds quite interesting don't you think? lol), pink 25mm Berisford Satin Ribbon and a snowflake charm tied on with some pink and white Divine Bakers Twine
I hope you will all pop over to the PTW blog and check out the delicious array of colours used by the DT and hope you have time to enter this challenge with your own favourite colour.
The prize this week is a gorgeous stamp 'Christmas Kiss' from Whiff of Joy
see you soon, Mary G x

10 December 2011

A Finnish Star with Fairies and Flowers ......


For many months I have kept a link to Debbi's blog where she showed her readers how to make this Finnish star - well, inspired by this weeks LOTV challenge (pink, white and silver - my favourites!) I set to and created this 3-dimensional beauty! Bad light prevented perfect photos, but not bad considering we've had the lights on all morning it's so gloomy.


I used double sided pink patterned paper 'Rose Coloured Glasses' and added a LOTV diecut with 2 little fairies (I thought it was rather apt as the current LOTV challenge blog will close and a new LOTV challenge blog begins in the new year and will be called Lili's Little Fairies  (and can I just take this opportunity of wishing Jacqui and Bev the very best of luck with the new challenge).

Once I had made the star itself (the instructions were spot on Debbi, thank you) I added the LOTV image on a scalloped mat of pink card, then embellished with pink and white roses, pretty blossoms and leaves, cut white leaves with my Martha Stewart punch then added a ribbon bow made with our new striped organza white and silver ribbon.  I used stardust stickles on the white leaves and the fairies, then added some raindrop shaped sparkly gems on the points of the star.  I will be making more of these, they are so pretty.
Flowers, roses, rose-leaves and ribbon are all from here. Gems and stickles from stash.
(Please don't forget the Ribbon Girl Blog is having a sumptuous red ribbon giveaway on Sunday!)
see you soon, Mary G x

6 December 2011

Go as you please with the option of something dangly .......


The new challenge over at Papertake Weekly is go as you please with the option of something dangly and this is my DT card - please pop over and take a look at the marvellous projects the other DT ladies have made, you will be so inspired to get crafting!!

I have used another LOTV die cut (so quick when time is limited) which I cut with a round nestie and matted onto lilac scalloped


I added some gorgeous lilac cotton scallop lace, mauve rose seam binding and lilac Twinkle ribbon and dangled a christmas tree and a reindeer charm.  The sentiment is a Papertrey ink stamp.


The flowers are 30mm soft purple/white rose, purple two tone and white pretty blossoms, plus white leaves and branches made with Magnolia doohickey die and my Martha Stewart punch, both liberally covered in Stardust Stickles.


I made a matching box and decorated it with the same paper, ribbons and flowers.  I was really pleased with this card and I made it especially for one of my neices who now has two little girls!
Lace, twinkle ribbon, seam binding, mulberry flowers and charms are all from Ribbon Girl
See you soon, Mary G x

3 December 2011

Anything but a Christmas card ......... how about a decorated candle?


This weeks LOTV challenge is 'anything but  a Christmas card .....  mmmmmm, what could I make for this challenge, a birthday card? a thank you card, a box? no, I decided to try and make a decorated candle which had been lying in the cupboard since last year.   Andrea and I usually spend Saturday afternoons crafting together, but she is in agony with her back, so much so, we had to ask the out of hours Doctor to visit us today and prescribe various types of pain relief - she's now a little bit more comfortable, and I expect she will fall asleep soon with the cocktail of pills he's given her.  So I had to craft on my own which wasn't quite the same - get well soon Andrea, love from Mam xx


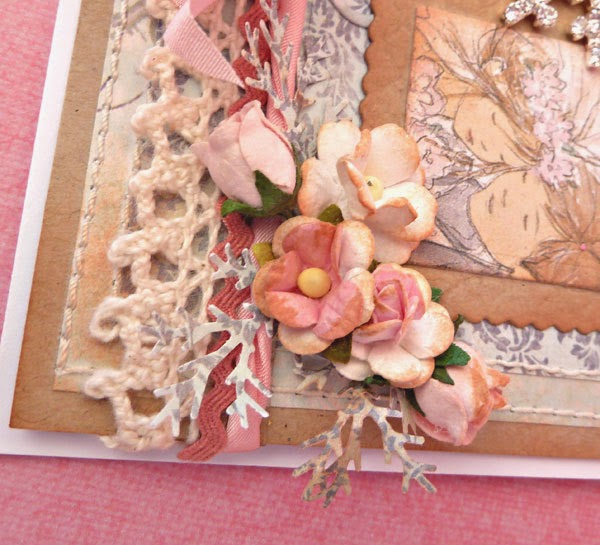
I stamped the LOTV image onto white tissue paper then coloured it in with Copics.  I chose darker colours as  I thought lighter ones wouldn't show up so well.  I cut out the image as close as I could and laid it on the candle - amazingly, due to static I suppose, the paper clung to the side of the candle.  I cut a strip of grease proof paper and put it over the stamped tissue then firmly held it tight at the back.

Now, there was one teeny weeny problem, the heat gun we have had for years and years was chucked out a year or so ago, so I had to try the hair dryer - and it worked!  I used the highest heat, and wafted it about until I could see the wax change colour - I think next time I will just heat straight onto the tissue paper.  I had a couple of dribbles, but they smoothed down OK.

After I had added my favourite Stardust Stickles to my image, I decorated my candle with some 38mm cream guipure lace 7mm shockin pink satin ribbon, rose leaves and 30mm pink two tone mulberry roses, all from here

This candle will be a little gift for someone but I will make sure they know that if they were to light it they must remove all the lace, flowers, ribbons etc, and take great care if it burns down past the tissue paper, as it may burn.
See you soon and don't forget to pop over to the Ribbon Girl blog on Sunday when I will announce the winner of the Pink and White Colour Challenge and also the Reindeer Give Away!!
Mary G x

1 December 2011

Fat ball thief caught on camera ..... and the reddest robin ...


Apologies for dreadful photos - taken a few minutes ago through the kitchen window (which could do with a bit of a scrub lol)  but I spotted the fat ball thief and grabbed the camera which was on the kitchen table!  The naughty squirrel picked it up in his paws and chewed through the green net


he jumped down, ripped off the netting and proceeded to feast on the fat ball!


and our little robin (who is the most beautiful colour - don't you agree?) just looked on in amazement!

again, sorry for the quality of the photos, but it's not often there is a camera handy when I see something interesting!
See you soon, Mary G

29 November 2011

New sketch over at Papertake Weekly .......


This card is for my great-nephew Jack and my DT card for this weeks Papertake Weekly sketch. I used another of the LOTV die cuts matted onto red card.  The ribbon is Berisford 25mm small check black and white gingham and I added three small red polka dot buttons tied with natural button twine.  I made the sentiment on the computer and matted that onto red card also.  The background papers were from a pad which Andrea bought for me.

Please pop over to Papertake Weekly to have a look at the fabulous work by the Design Team and you have one week to get your entry in - you could win a fab prize!!
(take note little sister, not a single flower, rosebud or leaf and not a drop of stickles!! it could practicallly be described as 'clean and simple' lol)
See you all soon, Mary G x

27 November 2011

Tilda with hearts ...........


Tilda looks so pretty holding her string of hearts, I've coloured her in pink copics and am especially pleased with her socks, I remembered to leave some white up the front lol!  I was inspired by this weeks Just Magnolia challenge, and I have used red card for matting and my background papers include pink and white.


I have used our new flat blossoms and added sparkly gems to the centre


I finished the card with stardust stickles (as usual) and used pink silky crush ribbon and pink and red heart pins, all available from ribbongirl
See you soon, and don't miss the Christmas Challenge and the Reindeer Giveaway over at the Ribbon Girl Blog

Mary G x

24 November 2011

Feasting on berries ....... under green trees ...... and a new Christmas challenge

There is a new 'Jingle all the way to Christmas' challenge over at the Ribbon Girl blog and inspired by this weeks Penny Black Saturday Challenge 'Green + Trees' I made this cute Christmas card using this gorgeous Penny Black stamp (which I bought from Tab who has loads of stamps for sale) which I coloured with copics,  I die cut some trees with my new Marianne Christmas Tree die, then smudged some white ink on them.  I put on plenty of Stardust Stickles. 

Apologies for the awful photo (taken at night) but you can see the gorgeous Penny Black hedgehog - the holly leaves and berries were part of the image, but I cut them off and placed them on the corner of the card. I used red silky crush to tie a bow and more stickles to enhance the cute hedgehog feasting on holly berries - speaking of which, it seems every holly bush or tree around here is covered in gorgeous red berries - the birds will do well!!    I will enter this into the Penny Black Saturday Challenge before it's too late ....    Red silky crush is from here

please scroll down to see the advent calender made by my little sister Jackie

I made this tree ornament from felt cut out with a nestie.  Before the two sides were stitched together I glued on silver flat cord, tiny ric rac then stitched on flower and heart shaped sparkly buttons - I finished it off with one of our chunky felt holly leaves with bead berries
Silver flat cord, felt, ric rac and buttons are all from www.ribbongirl.co.uk


This tree ornament was made with white card using a fleur de lys nestie, silver corners and loads of gems.  I finished it with green hat pins with red open weave ribbon at the top and bottom, and used flat silver cord to make a hanging loop.  The edges were covered in lots of stardust stickles.
Green hat pins and red open weave ribbon are from www.ribbongirl.co.uk


My sister Jackie doesn't have a blog, but she made this fabulous advent calender for one of her grand-daughters Faye (she'll have to make another one for her new baby grand daughter Nicole!).  Made of fabric and felt, it is her own design and it took her ages to make as every part of it has been hand drawn and hand stitched, including Santa and all of the little present bags, each has an embroidered number, a ribbon with a bell or charm and every one is attached with press studs to withstand handling over the years.  I love it and I'm sure it will last Faye for years and years!  Thanks for sharing this with us Jackie!
See you soon Mary G x

22 November 2011

PTW have gone Christmas Crackers .......


This is my DT project for the new Papertake Weekly Challenge 'Christmas Crackers'  .... you don't have to make a cracker – but you can if you want as some of the DT did.  No, they just want to see your Christmas faves – so Yule rules this week. If it’s festive, then it’s fine :)

I used an A3 piece of card and scored and folded until it resembled a cracker when opened.  The edges were made with a nestie and I decorated with 9mm red and white saddlestitch ribbon.


The inside was made with a LOTV sentiment and a couple of Magnolia snowflakes to which I added plenty of stardust stickles and a couple of large gems.     Do pop over to PTW to check out the fab creations by the Design Team and if you enter the challenge you could win three  stamps from Digital Delights!


and talking of delights, tomorrow evening I am going to see John Barrowman at Newcastle City Hall - can't wait!!  I hope he doesn't mind me pinching this photo from his website!!
See you soon, Mary G x

20 November 2011

Hello Dolly ...... and a new colour challenge ....


I fancied making a rag doll for a Christmas gift and this little dolly (approx 20 inches tall) is the result - I particularly like her arms which are attached using large pearl buttons using a very long doll making needle, so they move, and best of all they stay just where you put them.  I am still not sure about her features which as you can probably see, have been unpicked and re-stitched more than once - poor dolly!


Her hair took ages to make - almost a full ball of black cotton dk yarn, which was wrapped, cut, stitched then firmly stuck and stitched to the head - her bunches are tied with 7mm pink satin ribbon which is stitched to the side of her head.  I decided she looked better with a fringe so cut the front of her hair after she was all finished! I added pale pink small polka dot buttons to her shoes which are made from felt.  Ribbon, Lace, Buttons and Felt are all available from the Ribbon Girl online store


Her dress is embellished wiith 15mm pink satin ribbon and 18mm white cotton lace, and her pants are trimmed with broderie anglaise which although you can't see very much of them are made from pink spotty fabric. The pattern and all the fabric, including the body fabric, is from The Fat Quarters which is a 15 minute drive away and well worth a visit - the staff are so friendly and helpful

This is my DT project for Colour Challenge No 13 PINK & WHITE over at the Ribbon Girl blog - it will run for two weeks so you have plenty of time - there is some fabulous inspiration from our amazing Design Team - do pop over and have a look and I look forward to seeing all your gorgeous pink and white projects - you could win a great prize of one of our pretty pink mini ribbon kits


and a £10 voucher generously donated by Laila and Lisa to spend in the LOTV store - and they've got a gorgeous range of new stamps, just out!


See you soon, Mary G x